General safety regulations in the iNANO House
No lab coats in the foyer at any time
Never carry used laboratory glassware, lab samples, lab waste etc. through the foyer
General Safety Regulations
General Safety Regulations
For work in laboratories in the iNANO House, Gustav Wieds Vej 14, Bldg. 1590-1593, 8000 Aarhus.
The regulations cover basic chemistry, radioactive material, organic chemistry and work with microorganisms and GMO work, but only at a general level.
It is impossible for this website to cover everything, since many different techniques are being used. It is therefore the duty of every group leader (lecturer/professor) and supervisor to provide instructions for the safe use of special techniques. Furthermore, it is the duty of everybody working in the laboratory to seek the information required to work in a safe manner.
However, all safety rules are useless if not all employees make a continuous effort to maintain a safe work environment.
In connection to this, the following general principles must be made clear:
- It is a requirement to wear a lab coat during any kind of laboratory work. It is both sensible and compulsory by law (Arbejdstilsynet).
- Everybody finding a room or a piece of equipment that does not meet the safety requirements must take action immediately so that the situation can be remedied.
In some situations, it may be something simple so that you can do it yourself, e.g. wiping up a spill. In more complicated situations, help should be sought from one of the persons responsible for the room or the apparatus or one of the Work Environment Representatives.
All information in this website can also be found in this pdf with General Safety Regulations of the iNANO House.
This edition of the safety regulations is a thoroughly revised version of that from 2008.
Calling systems
Calling systems
The calling system is prepared for the house staff and cleaning staff in connection with accidents, incidents or other irregularities.
- Telephone numbers of the operating inspector/repairmen are found at all elevator doors. It should always be possible to get in touch with one of these.
- All laboratory doors have a list of names and telephone numbers of the project responsible who can be contacted regarding matters relating to the individual laboratory. If these cannot be taken, contact the building inspector.
In the event of a FIRE or ACCIDENT (and after activating the fire alarm), call both numbers!
Alarm center (fire, ambulance, police) | 112 |
AU's common alarm system | 8715 1617 (24-hour staff) |
Casualty ward (Skejby Hospital)- remember CPR number
| 7011 3131 (emergency doctor or treatment nurse on this number must ALWAYS be contacted before contacting the emergency room) |
Guard staff; In case of irregularities in buildings or inventory that need urgent attention, call:
- Within normal working time | |
Name | Mobile phone |
Building inspector Ove Fjordside | 2899 2013 |
Alternative repair, maintanance: Odd Steffensen Kasper Funderskov | 5177 8766 |
| Andreas Thunbo | 21669825 |
- Outside normal working hours and only in emergency situations | |
Dansikring (access control) | |
Building inspector Ove Fjordside | 2338 6146 |
Skadeservice Danmark (damage service) | 2899 2013 |
Construction damage service, Safety Partner | 8691 2141 |
| 7011 3113 |
iNANO building service, service mail | stbyg2service.okoplan@au.dk |
Building services, hotline | 8715 0506 |
First aid
First aid
Remember to register all accidents!
All accidents - both large and small - must be notified to the safety representative.
Near miss accidents must also be registered. A near miss is an event that could have developed into a work accident, but where nothing happened to the employee.
Near-miss accidents are characterized by the fact that the accident was avoided because of pure luck.
The four main steps of first aid
The four main steps of first aid
- stop the source of the accident
- give life-saving first aid
- call for any help needed
- give general first aid
Calling for help
Calling for help
Land line phone: Dial 0; wait for the tone, then dial 112. Cell phone: Dial 112
When you are connected, state clearly:
- Where the accident has happened
- What has happened
- How many persons are injured
- Who is calling
- From where the call is being made
- Make sure that the Emergency Service is met at the entrance to the building and is informed about all the details.
- Inform the safety representative/supervisor
Burns
Burns
- Immediately wash the burned area with cold water
- Remove loose clothing from the burned area
- Continue washing while someone else fetches a bowl of tepid water (22-23 °C)
- Dip the burned part into the tepid water and keep it there until the pain disappears - but for at least half an hour
- Cover the affected area with a cold wet compress and take the victim to the hospital’s casualty ward.
Frostbite
Frostbite
Frostbite can be divided into three categories:
- First degree:
- Produces white numb areas on the skin
- Second degree:
- Produces white and harder tissue in a large area, often blistering while thawing.
- Third degree:
- Produces white and hard tissue that when tapped sounds like tapping a piece of wood, in the worst case scenario. The tissue is dead and becomes spongy while thawing.
In all categories, first aid involves immersion in 38 degrees warm water. Be aware that this can be very painful. When the skin becomes red, a sterile bandage should be applied, carefully avoiding any pressure or cooling. For second and third degree burns, seek a doctor.
Corrosion - when exposed to internal, external and eye corrosion
Corrosion - when exposed to internal, external and eye corrosion
Internal corrosion:
- Do not induce vomiting
- Immediately drink plenty (milk or water)
- Call for ambulance or bring the injured person to the hospital’s causality ward. Bring information about the corrosive substance (name, chemical formula and container).
External corrosion:
- Rinse immediately with plenty of water
- Remove clothing - continue rinsing for 10 minutes.
- If pain continues, rinse for another 10 minutes.
- If there is no improvement, take the victim to the hospital’s casualty ward, by ambulance if necessary. Bring information about the corrosive substance, (name, chemical formula, and container)
Eye Corrosion:
- Immediately flush with plenty of water in non-vigorous jet with the fixed eye shower at the sink.
- Rinse from the nose root and outward.
- Continue to rinse with the eye wash bottle.
- Always seek medical or go to the hospital’s casualty ward
- Bring information about the corrosive substance (name, chemical formula, and container).
Poisoning
Poisoning
When the victim is conscious:
- If the substance involved is neither an organic solvent nor a corrosive then vomiting can be induced by sticking a finger down the victim’s throat, possibly after giving a drink of water.
- Place the victim in a recovery position.
- Take the victim and the vomit to a casualty ward, by ambulance if necessary. Bring also the vomit to the hospital.
When the victim is unconscious:
- Place the victim in a recovery position.
- Call for an ambulance. Bring information about the poison (name, chemical formula, container, if any).
First Aid Supplies
First Aid Supplies
A First Aid box is to be found in the laboratories on each floor and in the student helper office. Make a note where they are to be found before you need them. Inform your Occupational Health and Safety representative/supervisor if something is missing from the box.
Use of eye rinsing bottles
Use of eye rinsing bottles
 Eye rinsing bottles with intact seal must found be in all laboratories; either the older type with sterile physiological saline, which is pressed against the eye, after which the plastic bottle is squeezed and thus the eye is rinsed.
 - The new type containing a phosphate buffered (pH 7.4) sodium chloride solution (PBS). This achieves far better and faster neutralization of bases and acids, and that prolonged rinsing of the eye at no time becomes painful. There is sufficient liquid in one bottle for 15 min continuous rinsing. The bottles are designed in accordance with upcoming EU rules, which say that the bottle must be able to be used quickly, even if you are alone and that there must be a possibility for 30 min of continuous rinsing (the bottle holder always has 2 bottles).
- Remove contact lenses quickly
- Put the bottle against the eye
- Press the two "wings"; The seal is broken and the lower and upper eyelids are gently forced up and the rinse starts with a very soft jet.
- The eye wash bottle works in any position and should be used during transport to the hospital’s casualty ward.
With helper:
In severe etching, a reflective eye closure follows, so the affected person cannot adequately flush his/her own eye. The nearest one has to help.
The liquid in the eye wash bottles must always be sterile - see the instructions on the bottle.
Fire extinguishing
Fire extinguishing
Call the fire service by pressing 0 - 112 and give one of the following addresses to the alarm center:
- Fire in the INANO house
- Gustav Wieds Vej 14, building 1590, 1591, 1592, 1593
Be prepared to provide information about the injured, what is burning and what phone number that is calling.
Quenching a fire is the task of the fire brigade, but it is important to act properly until the fire department reaches out to save any threatened people and limit the amount of fire.
- Get everyone out of the burning room / building. Use the stairs - not the elevator.
- Close windows and doors. This prevents access of oxygen to the fire and limits the extent of the damage.
- Warn people near the burning room. This applies not only to the rooms on the same floor but also on the floor above.
- Follow the instructions on the wall-mounted holders for evacuation equipment
NOTE! It may be fatal to enter smoking and burning buildings. It should be left to the fire service's specially trained crew.
Make sure that the fire service is met outside the building and is immediately informed about the
- Location of the fire
- Extent of the fire
- If there are people left in the fire-threatened area
- If there are special conditions that apply - pressure bottles, chemicals etc.
Remember to notify the switchboard/security personnel that the fire service is alerted.
Emergency shower is located above the door in most laboratories.
Fire blankets are available in all laboratories or just outside the laboratory.
CO2-extinguishers and hand sprayers/fire hoses are placed on all floors.
Familiarize yourself with the location and use of these before it's too late!
Good laboratory practice
Good laboratory practice
General rules for work and tidiness
General rules for work and tidiness
- It is compulsory to wear a lab coat in all experimental laboratories.
- Do not begin an experiment until you have collected everything you need (substances and apparatus).
- All smelly and dusty work and cleaning of the used equipment must be carried out in the fume hood.
- Follow all instructions closely. Any deviation should only be made after consulting the supervisor or instructor.
- Keep continuously updated logbooks on all lab work.
- Water pumps must NOT be used for suction filtration. Instead use membrane pumps or vacuum pumps with a trap.
- Instructions for use and function should be found on each fume hood.
- It is forbidden to eat, drink or smoke in the laboratories.
- Keep the laboratory clean and tidy.
- Put small apparatus back in its place when not in use. Keep the floor free of
- apparatus, boxes, waste, etc.
- Put containers of chemicals and bottles of reagents back in place after use.
- Keep the fume hood clean and tidy.
- Cans and bottles with inflammable liquids (solvents) must not be placed on the
- bench or on the floor. They must be stored in a special hood or hoods with
- ventilation.
- Water spills must be wiped up immediately to avoid the risk of slipping.
- Spilled chemicals must be cleared up immediately and disposed of according to the
- instructions given.
- Glassware must be cleaned as quickly as possible after use before being sent for
- dishwashing.
- The laboratories must be left clean and tidy after work
Preparation of Laboratory Work
Preparation of Laboratory Work
It is important that lab work is carefully prepared, with regard to both safety and the end result. A continuously updated lab logbook is an invaluable and indispensable tool in this respect.
An evaluation of the risk and safety precautions is an important part of the preparation for your work. For example, it can be necessary seek information on the properties of a substance: State, reaction with water, combustibility (kindling temperature, explosion limit), caustic and corrosive properties, odour, toxic properties and especially long-term effects, penetration of rubber and plastic (gloves) its possible hygienic threshold.
For many known chemical reactions and products, much of this information is unavailable. Only typical physical and chemical properties are registered. However, various types of literature have articles describing substances that are hazardous to health and the environment.
When preparing for lab work (whether experimental or routine) each person must consider the risk involved.
- As a result of the physical, chemical and toxic properties of the chemicals, substances and compounds that are to be used or that can be formed.
- As a result of special characteristics (e.g. heat production) for the reaction or procedure that is being followed.
- As a result of the apparatus construction to be used.
- Search the literature for any missing information.
- Note down any relevant information in the laboratory logbook with regard to risks and precautions.
- Whenever alternative procedures are possible, then the least risky must be used.
- When a huge risk cannot be eliminated, consider dropping the experiment. If this is not possible, the project leader should carry it out or should watch over the procedure.
- The scientific staff member who starts up a project (project leader) must be acquainted with the health and environmental risks involved. Furthermore, the project leader is responsible for informing all persons (staff and students) involved of these risks so that they can take the necessary precautions before the project is started.
- Be prepared to give first aid to yourself and to others in the event of an accident or incident.
Fume hoods and the use of these
Fume hoods and the use of these
All work with substances and reactions that give rise to hazardous or malodorous gases or vapours must be carried out in a fume hood. As a general rule, the fume hood should be used for all forms of chemical work whenever possible.
The degree of safety provided by the fume hood depends partly on its technical and construction conditions and partly on personal and actual conditions, namely:
- The type and amount of the substance being used.
- How the user handles the substance and how the fume hood is being used.
- The set-up of apparatus or other kinds of hindrances to the flow of air inside the fume hood.
The temperature inside the fume hood.
The following rules apply to the use of fume hood:
- After opening the fume hood check that air is being extracted and that the alarm works. Be wary of a possible failure.
- Always have the least possible opening. It is not always possible to keep the fume hood completely closed when working in it.
- Respect the alarm. When it sounds, make sure to find out what is wrong.
- Keep your face (respiratory zone) over the lower edge of the fume hood window.
- Apparatus should be placed at the back of the fume hood and as far as possible from the side walls. Large apparatus that can interfere with the flow of air should be raised ca. 5 cm.
- Avoid rapid movements when working and when opening the fume hood. Make sure to button your lab coat. Do not have windows open and avoid moving quickly past these as this increases the risk of contamination.
- Keep to the general safety rules for working with inflammable material when working in the fume hood. An open flame must not be used.
- Keep the fume hood clean and tidy. Clear up and wipe the floor of the fume hood. It must not be used for storage of for example chemicals.
- In the event of any failure that is likely to be a safety risk, all work must be stopped immediately. Inform the management, the Occupational Health and Safety representative/supervisor or the departmental safety organisation about the incident.
- Equipment with heating must always be placed on a lift table so that heating can be turned off safely.
- Every three months, and own-check must be conducted of each fume hood and entered into the logbook or on form kept by the fume hood. The own-check includes control of the suction of the fume hood by putting a piece of paper on the edge of the fume hood, control of alarm with light and sound and clean-up.
Fume hood alarm:
The Danish Working Environment Authority (”Arbejdstilsynet”) demands that fume cupboards be fitted alarms that are activated when the airflow is inadequate.
Each fume cupboard has its own alarm, which sounds and shows a red light when the airflow falls below a certain level.
When a fume cupboard is closed there is still a slight suction. When the window is opened, the airflow is increased, but when the height of ca. 40 cm is reached, the alarm is activated. Even before this height is reached, air movement around the opening can reduce the effectiveness of the air flow, especially if more than one fume cupboard in a laboratory is open at the same time, as there is a limit to the total capacity for suction.
Working outside normal working hours
Working outside normal working hours
- No one who is alone at iNANO is allowed to carry out experimental or work that carry a risk factor. When working alone with non-risk procedures, you should ensure that at least one other person knows where you are.
- When laboratories or other rooms are left for the night, weekend etc., all windows must be closed and lights turned off.
- Any alarm system must be activated. Electrical apparatus that are not in use should be unplugged and all gas and water taps turned off (also permanent cooling devices).
- If it is necessary to have an apparatus running overnight, then cooling connections and all tubing must be fastened securely. Electrical systems must be secured against any unforeseen temperature rise that could cause a fire.
- The responsibility for ensuring that all the safety rules are followed lies with the person who set up the experiment.
Personal safety equipment
Personal safety equipment
This section mostly deals with the protection of eyes, skin and respiratory organs.
Safety goggles and face mask
It is mandatory to wear safety goggles or a face mask when working with liquid nitrogen. It is also required to wear safety goggles or a face mask when working with anything that can splash when boiling, or can splinter, when working with strong acids, bases or radioactive materials.
When wearing contact lenses: be extremely careful when working with strong acids, bases or poisonous solutions. If any of these substances come into contact with the eye they may come underneath the contact lens and damage the eye. Therefore, always work in the fume cupboard and wear safety goggles. In the event of an accident, it is extremely important to remove the contact lens so the eye can be thoroughly washed.
Safety goggles are found in various qualities and sizes. They must have side protection so that there is less likelihood of particles coming into the eye from the side. Some have adjustable side lengths, some are adjustable up or down so that they fit the individual. Usually they are made from strong plastic material (e.g. polycarbonate) - their weakness being that some organic solvents can dissolve the surface so they become opaque.
Gloves
Safety gloves are used when needed to protect the hands from substances that can damage the skin, either directly or by penetrating the skin and cause damage elsewhere.
When should gloves be used?
- Wearing gloves is absolutely necessary whenever there is a danger for skin contact with hazardous substances (e.g. when cleaning up a spill, when the hands are dipped into a substance, when hands are in contact with skin-penetrating vapours, when there is a risk of spillage etc.).
- Wearing gloves is also necessary when skin contact with experimental solutions can be harmful for the experiment itself (transfer of microorganisms, proteases, nucleases or other skin-borne enzymes).
- In other situations one should consider whether it is at all necessary to wear gloves, since they retain moisture so that the skin becomes overheated and its pores open up. Cotton gloves can be used as under gloves to absorb the moisture. Some glove material can give rise to eczema or allergy (especially latex).
- When working with solids, the cheapest disposable gloves can be used as solids do not penetrate. However, this is assuming that the gloves are not wet and that one is not working with solvents at the same time.
Penetration times
- Not all gloves are equally resistant to all substances and materials.
- Penetration times provide data showing how much time can elapse from the first contact until the first traces of the substance getting through the glove.
- Penetration times are provided by the glove producer.
- Notice that penetration times often refer to pure substances and not blends.
- It is always necessary to know penetration times when working with liquids.
- When working regularly with a special blend, it is possible to test the penetration time by using a special glove tester. Several authorised advisory bodies offer this service.
- See Aarhus University’s (SvF AU) “Glove database” (“Handskedatabase”)
- See also “Quick selection guide to chemical protective clothing”, Krister Forsberg, S. Z. Mansdorf, Fourth edition.
Provisions and precautions
- Use only gloves approved by DS/EN 374-3. Approval means that the gloves have been tested for one or more chemical with regard to penetration and that it is possible to obtain test data from the producer.
- In biological work it is often sufficient to use disposable gloves that are only approved for food use. Make an assessment before starting work
- Preferably use disposable gloves that can be thrown away if they come into contact with a chemical or when the penetration limit has been reached.
- Use gloves that are not powdered (allergy risk). The powder (cornstarch) does not itself cause allergies, but can be an irritant and carry possible allergy-causing molecules from the glove material.
N.B. There may be a risk of allergy even from powder-free gloves.
General advice on using gloves
Before putting on gloves:
- Hands should be clean and dry.
- Avoid wearing rings inside gloves.
- The gloves should be intact
- When working with liquid chemicals make sure you know the penetration time for the gloves you are using. This is calculated from the first contact with the substance.
- If the gloves are to be worn for more than 15 min, inner cotton gloves will help to absorb moisture from the hands.
Gloves must be changed:
- If they break, are torn, etc.
- Before the penetration time has been reached, even if the gloves are intact
- If gloves become dirty on the inside (often with short cuffs)
- When inner gloves become wet
- After work and before breaks, etc.
- Always wash hands when changing gloves.
- Remove gloves before touching cabinet doors, door handles etc.
Good hand hygiene
- Good hand hygiene is extremely important as dry and cracked hands increase
- the risk of picking up substances and materials that can cause eczema and allergic reactions.
- Wash hands thoroughly and often.
- Dry hands carefully and rub in a nourishing hand cream.
- If one type of glove gives problems, change to another type or to another size.
Respiratory protection
Only under very special circumstances, e.g. in the event of accident, will it be necessary to use respiratory aids (gas or dust masks). Respiratory organs are primarily protected by avoiding situations likely to give rise to hazardous gases, vapours or dust, such as working in a fume hood.
Gas cylinders, liquid nitrogen, dry ice
Gas cylinders, liquid nitrogen, dry ice
Gas cylinders with pressurised gas are frequently used in all types of laboratory work and carry many risk factors. Damage to a gas cylinder can cause it to explode because the gas is under high pressure. A broken valve can result in such a violent rush of gas that the cylinder becomes a projectile. The escaping gas from a damaged cylinder or a badly conducted experiment can cause an explosion and fire, poisoning, corrosion or choking, depending on the type of gas. A list over the most commonly used pressurised gases is found below:
The pressure at 20°C in the cylinders we use:
150 - 200 atm | 10 - 60 atm |
Hydrogen | Carbon dioxide (56 atm) |
Oxygen |
|
Nitrogen |
|
Helium |
|
Working with and storing liquid nitrogen and dry ice involves the risk of frostbite (N2, -196 ° C ; CO2, -78 ° C) and for asphyxiation (choking) (1 L liquid nitrogen at 20 °C, 1 atm will have a volume of ca. ¾ m3). Carbon dioxide also has a physiological effect and can cause immediate death in concentrations of 10 - 20%. Liquid nitrogen is widely used in cold traps and can cause atmospheric oxygen condensation both within the trap and in the liquid nitrogen tank. This oxygen can cause violent explosions in the presence of oxidizable substance, e.g. organic compounds.
- Gas cylinders must be transported on a trolley and must be locked with a chain.
- Gas cylinders must not be moved when the reduction valve is in place. The protective cover must be in place when moved.
- Both empty and full gas cylinders must be secured against falling whenever they are used or stored.
- Gas cylinders must not be subjected to knocks or strong, especially exposed heating (sun, radiators, etc.)
- Gas cylinders must not be opened with heavier tools than those recommended.
- Gas cylinders must be protected against backward suction from wash bottles and reaction containers by inserting a safety trap.
- A triangular warning sign with the text “Gas cylinders to be moved in the event of fire”, must be found wherever gas cylinders are used or stored.
- Safety goggles or a face mask must be worn when drawing off or pouring liquid nitrogen.
- Liquid nitrogen and dry ice must not be transported in a manned elevator. Danger of choking! Neither should these substances be transported in a closed car.
- First Aid for frostbite and choking: See section on First Aid.
Flammable liquids
Flammable liquids
- Liquid: Substance that is fluid at normal temperatures and pressure.
- Kindling point: The lowest temperature at which a liquid emits flammable vapors.
- Flammable liquid: Liquid with kindling point below 100 °C.
- Class I: Flammable liquid with kindling point below 21 °C.
- Class II: Flammable liquid with kindling point of 21-55 °C.
- Class III: Flammable liquid with kindling point above 55-100 °C.
All 3 classes are classified in subclass 1 for not water miscible and subclass 2 for liquids that are water miscible under all conditions
Class | Storage amounts | Max. storage in | |
Glass | Approved plastic or metal container | ||
I II III |
1 L 5 L 50 L |
2.5 L 5 L 10 L |
no restrictions up to 25 L no restrictions up to 125 L no restrictions up to 1250 L |
Plastic packaging over 125 ml must always approved by the Danish Emergency Management Agency (”Beredskabsstyrelsen”).
The given amounts refer to the total amount of stock, usage and waste.
Altogether, there should be no more than 50 storage units per laboratory
Containers with inflammable liquids of Class I-1, I-2, II-1 and III-1 must not be placed in any of the escape routes (corridors, stairways, etc.).
Flammable and explosive chemicals
Avoid working near open flames or where there is a risk of sparks.
NB: Explosive substances eg. diethyl ether and petroleum ether should not be stored in a normal refrigerator.
The information given in this section comes from the following sources:
- Kemikalier og Sikkerhed, Teknisk Forlag, 1976.
- Merck Index, 11th edition, 1989
- Hommel's Handbuch der gefährlichen Güter, 1973/74.
See also the KIROS database (https://www.kiros.dk/Web/)


Chemicals
Chemicals
Working with chemicals
Working with chemicals
Avoid contact with chemicals in all situations where chemicals are handled: Weighing out, pouring, routine lab work, transporting, cleaning up and disposal of waste.
- Avoid any contact of chemicals and solvents with the skin or eyes.
- Wear lab coat, gloves and safety goggles.
- Avoid breathing in chemicals and vapours. Always work in the fume cupboard.
- Weighing out of chemicals must always be carried out in a fume cupboard or point suction.
- Wipe up any spills immediately.
Storing chemicals
- Chemicals must be stored in closed, clearly labelled containers: Name, formula, melting point/boiling point.
- Possible hazardous characteristics: Explosive, inflammable, self-igniting, water or air sensitive, caustic, poisonous, allergenic or carcinogenic.
- Solutions in ether and other volatile solvents can only be stored in the refrigerator when explosion-safe. Beakers must not be used. Use only closed flasks and bottles.
- Only small amounts of inflammable chemicals/solvents can be stored in the laboratory.
Transporting chemicals
- Chemicals transported out of the laboratory must be in closed containers. Glass containers must be carried in a carrying basket or on a trolley.
- Specially volatile, fuming, caustic, inflammable and explosive chemicals must not be transported in a manned elevator. This applies for example to volatile solvents, liquid nitrogen, dry ice and fuming acids.
Chemical spillage
- Spilled chemicals must be wiped up immediately. Liquids are absorbed by porous material (cat litter, sand, vermiculite, etc.) after neutralising and /or diluting with water. Spilled powder can be dusty to wipe up, therefore use suitable personal protection must be used. For disposal, see under the section Waste Disposal.
- Contaminated clothing should be changed as quickly as possible. Shoes, watch straps, etc. that have absorbed liquids should be removed immediately.
Peroxides and other unstable substances
Peroxides and other unstable substances
For substances or containers with possible explosive qualities, age, storage temperature, light and air can be crucial for stability, so it is of utmost importance that these substances are not bought and stored in large quantities.
The Danish Emergency Management Agency (”Beredskabsstyrelsen”) has complete information on peroxides and formic acid.
If in doubt about high peroxide contents then be very careful about carrying and opening the container. A simple method of checking whether there are peroxides in e.g. ether is to mix a couple of mls with a potassium-iodide solution, add a couple of drops of diluted HCl and shake. The brown colour of iodine is a sure sign of peroxide.
The peroxide content can be checked with Peroxide Strips (Merck 1.10081.0001, level 1- 100 mg/L H2O2). Most peroxide-forming chemicals carry a stabiliser when delivered and chemical companies usually guarantee the shelf-life in unopened containers for three to five years from the production date. For chemicals not containing added stabilisers, there is a shorter shelf life.
Some peroxide-forming substances can reach explosive peroxide levels without a concentration of the solvent, and the general rule for substitution means that there should be a special reason for using diisopropylether.
According to the Danish “ADR” rules for transporting dangerous material, many of the ethers used routinely are classified as class 3 inflammable liquids. These rules (article 2.2.3.2.1) state that Class 3 liquids that easily form peroxides can only be transported by road when the peroxide content is no more than 0.3%, i.e. 3000mg/L. Such a high peroxide content will seldom be found in a laboratory, and unused peroxide-forming substances will normally be disposed of via the waste disposal system.
If in doubt – or it is known – that a substance has a high peroxide content (limit 100ppm), contact an Occupational Health and Safety representative/supervisor for further information, e.g. it could mean destroying the peroxides with an acid solution of ferrous- sulfate.
Containers with unstable chemicals should be labelled with date of purchase, date of opening, stability control, location, etc.
List of incompatible substances
List of incompatible substances
Unless the mixing process is under control do not mix:
- oxidising agents and reducing agents
- acids and bases
- water-reacting substances and water.

Please note: Concentrated or fuming nitric acid + ethanol must not be used for cleaning glassware because of the danger of explosion.

Water-reacting substances and water
Water-reacting substances react radically with water, often producing a lot of heat and in many cases producing gases. When mixing, pour the substance carefully into the water – never the other way round.
Examples of such substances are:

Instructions for working with hazardous substances
Instructions for working with hazardous substances
Hazardous substances are defined as those substances that are dangerous for health and the environment.
Information can be found in Kiros and in the "Order of Dangerous Substances List", volumes 1-3, which are found in most laboratories. You can contact your environmental representative for an updated version.
According to the new Globalized Harmonized System (GHS) hazard scheme, hazards are classified as seen in the figure below. A full description of hazard and precautionary statments can be found in the General safety Regulations at iNANO.

It is your duty to obtain all the necessary information about the chemicals you need before you start an experiment. They are found in Kiros and in the supplier instructions.
Substances labelled with hazard symbols, as well as powders for media that can cause allergy, must always be handled in a fume cupboard.
The damage caused by chemicals - acids, bases or special cell poisons, depends on the nature of the substance, also on the concentration of the substance in the tissue and the time in which the substance is allowed to affect it. Therefore
- Avoid splashing on the skin, ie. always work with gloves and cauldron.
- Avoid breathing vapours, ie. work in a fume cupboard.
Remember that gloves only gives limited protection. Some substances penetrate certain gloves very quickly. There are many different types of gloves, see the section Personal valuables or ask the safety representative or the laboratory technician.
Waste on tables and floors must be immediately dried up. Dirty glass is rinsed with plenty of water before being sent to dishwashing.
The scientific employee ordering or otherwise bringing a chemical into the laboratory must check and take responsibility for the availability of the chemical instruction manual and the necessary protective measures, including labelling of the substance, and the instruction of anyone who is to handle the substance as well as waste disposal.
Safety procedures when working with phenol
Safety procedures when working with phenol
Injury to the skin: If phenol comes into contact with the skin, wash immediately with plenty of water, after which the skin must be wiped for at least 15 min with gauze or a cloth soaked in a mixture of polyethylene glycol (PEG 400) and ethanol in the ratio 7:3. This should continue until every trace of solidified phenol is removed. Wash again with plenty of water. Clothes spotted with phenol must be removed immediately. The person giving aid must wear gloves.
Wherever phenol is used there must always be found a clearly labelled bottle of polyethylene glycol 400/ethanol in the ratio 7:3.
If this mixture is not to be found, wash with plenty of water for at least 15 min. If the injury is of a serious nature, take the victim to a hospital and give a detailed description of the type of accident and the procedures taken.
Injury to the eyes: If phenol splashes into the eyes, the phenol must be thoroughly washed away with a mixture of polyethylene glycol 400 and water in the ratio 1:1. Thereafter, wash with water for 5-10 min.
Wherever phenol is used there must always be found a clearly labelled bottle of polyethylene glycol 400/water in the ratio 1:1.
If this mixture is not to be found, wash with plenty of water for at least 15 min. Take the victim to a hospital, possibly to the eye department. Washing must be continued during transportation with the aid of an eye bottle, until a doctor has taken over.
Injury to the mouth, throat, etc.: Phenol in the mouth should be washed out with water, and followed by a couple of spoonfuls of edible oil. Do not try to induce vomiting.
A clearly labelled bottle of edible oil should always be found wherever phenol is used.
If the victim is unconscious and is not breathing, artificial respiration should be administered. If the victim is unconscious but breathing normally, then treat according to general first aid for shock: Turn the person on one side with head lower than the rest of the body and keep warm with a blanket or coat. Unconscious persons must never be given anything to drink.
After necessary first aid, the victim should be taken to a hospital and the staff be informed about the type of accident and the procedures taken.
See also workplace guidelines for Phenol.
Safety procedures when working with acrylamide
Safety procedures when working with acrylamide
Acrylamide is a white crystalline powder that is easily taken up through the skin, the lungs, and the wall of the intestine. Acrylamide is carcinogenic and can affect the nervous system even when only small amounts are ingested.
Acrylamide must therefore be handled with extreme caution, both in crystalline form and when in solution so that there is minimal risk for skin contact or ingestion by nose or mouth.
Therefore:
- All procedures involving acrylamide must be carried out in the fume cupboard, also when making gels.
We suggest that all groups buy acrylamide-bisacrylamide as ready-made solutions.
Thorough cleaning is essential so that others are not subjected to contact with acrylamide.
All glassware must be carefully rinsed.
Always use nitrile-disposable gloves (see section on personal safety equipment), also after polymerisation.
See also workplace guidelines for Acrylamide.
Safety procedures when working with ethidium bromide
Safety procedures when working with ethidium bromide
From 1 January 2009, SYBR Safe is to be used instead of Ethidium Bromide – see website for further details.
In special cases, if it is not possible to replace ethidium bromide with SYRBR Safe. Ethidium bromide is a powerful mutagen, possibly also carcinogenic, and must be handled with extreme caution. The following guidelines are suggested in order to minimise the risk involved in working with this substance.
- As a general rule, all work with this substance should be carried out in a fume cupboard or in another well-ventilated place. When transporting gels and solutions containing ethidium bromide, always use a closed container.
- Wear gloves whenever handling gels. Dispose of the gloves immediately afterwards so that door handles and suchlike are not contaminated with ethidium bromide.
- Solutions for disposal must be kept in a closed container or destroyed according to the procedure below. The methods suggested do not eliminate other methods of destruction.
See also workplace guidelines for ethidium bromide.
Destruction of ethidium bromide in solution:
1) Destaining Bags from CLP (VWR-Bie & Berntsen, CLP 5459.25)
- Buffer with ethidium bromide should be collected in a suitable container with the “tea bag”. Incubate overnight with stirring or on a rocking table.
- The effectivity is controlled by measuring the absorbance at 343 nm.
- The liquid can then be disposed of into the sink.
- The “tea bag” can decontaminate 1 l buffer with an ethidium bromide concentration of 0.5 mg/ml.
2) Active carbon filter, Carbon Cap 75 (Frisenette APS, 67047500)
- Buffer solutions with less than < 2 mg ethidium bromide/l can be cleansed by passing through the filter after which it can be thrown directly into the sink.
- It is a good idea to filter the buffer solution through a normal paper filter before passing it through the carbon filter, because gel pieces can clog the filter.
- Carbon Cap has a capacity of about 200 mg ethidium bromide. Measure the absorbance at 343 nm regularly to make sure the capacity is not overloaded.
- Gels are disposed of in a closed plastic bag as solid hazardous waste.
Disposal of both Destaining Bags and Carbon Cap 75 is treated as B-waste, i.e. in closed plastic bags.
In the event of large spills of ethidium bromide solutions, use absorbing material as described in this leaflet.
Instructions for working with radioactivity
Instructions for working with radioactivity
Below, some general and practical advice is given concerning the handling of isotopes which are used in our laboratories at present. Whenever a new isotope is introduced, it will be included in the collection.
It is taken for granted that when working with isotopes, the safety rules which apply for working with hazardous chemicals also apply here, i.e., wear lab coat, gloves, safety goggles (when required), etc. Furthermore a thermoluminescent dosimeter (TLD/TL dosimeter) must be worn, either a personally registered dosimeter with quarterly/monthly checking, or an extra dosimeter that can be used by other persons as required and then sent for checking after use. The Government Bill 823 of 31 October 1997 form the basis for these rules. In contrast to the earlier Bill, the maximum allowed dose per person has been lowered to 20 mSv, and there are special rules for working with radioactive substances while pregnant (see next page).
Units of Activity: 1 mCi = 37 MBq 1μCi = 2.2 x 10⁶ dpm (decay per minute)
1 MBq = 27 μCi 1 Bq = 1 dps (decay per second)
List of isotopes emitting β-particles
Isotop | Maximum energy | Half-life time | Radionuclide group |
3H | 0.018 MeV | 12.3 years | 4 |
14C | 0.159 MeV | 5760 years | 3 |
35S | 0.167 MeV | 87.2 days | 4 |
32P | 1.71 MeV | 14.3 days | 3 |
33P | 0.249 MeV | 25.4 days | 3 |
After storage for 10 half-lives, the radioactivity is decreased to about 1/1000. This will often be an appropriate time for contaminated glassware and other highly radioactive waste.
In the INANO house, p.t. (July 2015) only isotope labeled with 32P isotope
The INANO house has a S1 1/10 permit. This permission entitles to storage of up to 500 MBq 32P
Protection against radiation
For β-particles, the maximum range is dependent on the particle's energy. The particle is slowed down, and the heavier the braking substance, the quicker the particles are slowed down. Please be aware that the absorption of particle radiation in a heavy absorber gives a more powerful braking radiation than absorption in a light absorber. Plexiglas therefore offers better protection against 32P than ordinary glass.
Range and necessary shielding for selected isotopes:
Isotop | water | air | Shielding thickness |
3H | 0.006 mm | 6 mm | Not necessary |
35S | 0.3 mm | 30 cm | 1 cm perspex |
14C | 0.28 mm | 24 cm | 1 cm Perspex |
32P | 0.8 cm | 720 cm | 1 cm Perspex |
33P |
|
| 0-1 cm perspex |
125I |
|
| 3 mm lead or lead glass |
Storage of radioactive substances
Radioactive material must be stored in the refrigerator or freezer in an isotope laboratory, and must be registered in the isotope inventory database (The “HOT” database). The cabinets are fitted with locks. In the INANO House, 32P material is stored in room 1592-319, which functions as S1/10 laboratory. Niels Sandal (MBG) has the overall responsibility.
When planning to purchase radioactive material, the purchaser is responsible for making sure that the total allowable inventory for each isotope is respected. This information can be found in the database, KIROS, which is the department’s chemical registration system (https://www.kiros.dk/Web/). The purchaser is also responsible for registering all new purchases in this database, and all users must make sure that they register in the database every time they use any of the stored isotope.
Maximum limits for work with radioactivity
If there is a C-laboratory in the building, work with S1/100 quantities can be done in all other laboratories. If activity levels exceeding the S1/100 limits are to be applied, it is possible to apply for dispensation for S1/10 classification. An application is required for each isotope.
S1/10-laboratorium | 32P, 14C, 33P |
MBq / μCi in use at any one time simple wet procedures Wet procedures Procedures with dry material
|
50 / 1350 5 / 135 0,5 / 13,5 |
Below are examples of what can be defined as:
· "simple wet procedures": Extraction from stock solutions, dilutions.
· "wet procedures": Normal experiments.
· "procedures with dry material": Work involving a certain risk: chromatograms, evaporation, dry gels.
The term ”in use at any one time” means the maximum amount of activity that can go on in any one laboratory at any given time. If several experiments are going on at the same time in the same laboratory, then the maximum amount per experiment must be reduced to compensate for an increased risk of contamination and accident.
The maximum amount of radionucleotide that can be stored in a laboratory is the same as that stated for a wet procedure.
Guidelines for working with isotopes
· Upon extraction from vials with rubber cap: Always insert a needle with a cotton wool in the ampoule before use to equalise pressure differences (many compounds have been on dry ice and therefore assume considerable pressure by warming to room temperature).
· General care must of course be shown. Always use plastic trays, gloves, etc. when working with isotopes.
Guidelines for working with isotopes 32P and 33P
· 32P-ampoules must always be stored in a lead container.
· All work with isotope amounts larger than 1 mCi (40 MBq) must be carried out in an isotope laboratory. Handling of the isotope must take place behind a plexiglass or a similar screen. Work with small amounts of isotopes can be carried out in S1 or S1/10 laboratories.
· Always use a plexiglass tray and use nitrile gloves.
· Avoid using glass when working with 32P, because “Bremsstrahlung” can be formed.
· Always keep a monitor beside you.
· Check yourself and the work top with the monitor frequently, e.g. every time you leave the area.
· The whole laboratory must be checked with a monitor once a week and the results recorded in a special protocol to be found in the laboratory.
· Use a plexiglass box or lead container for transport between laboratories.
Disposal and cleaning-up after working with 32P and 33P
· Liquid waste must be diluted to < 2.7 μCi (0.1 MBq) per litre and poured down the sink. Afterwards let water run down the sink for about 5 min. The maximum monthly limit that can be disposed of in the sink is 1.35 mCi (50 MBq) per permit.
· Liquid waste, which in addition to 32P contains organic solvents (phenol), should be collected in a fume cupboard (e.g. in a special plastic container together with other phenol waste) until the isotope has decayed. It is then disposed of according to the Departmental rules.
· All solid waste contaminated with 32P must be collected. Use the plexiglas containers in the isotope laboratory. Very weakly contaminated things (gloves, etc.), can be thrown into the usual hazardous waste boxes. All fluid waste, marked with group name and date, must be cleared away after six months.
· Contaminated objects can be washed with Decon (use only the sink in the isotope laboratory). When there is no trace of contamination, they can be sent for washing. If there is still contamination, put them to soak in a decontamination bath overnight. If this is still not sufficient, store the objects for 10 half lives.
· Cleaning-up the work area: Check the work area with a monitor and decontaminate any contaminated places. Remember that an isotope laboratory does not necessarily have to be contaminated!
· 32P waste from the isotope laboratory is stored in plastic container for approx. 10 half lives (5 months).
· The box is sent for incineration when the total radiation level is less than 1.3 mCi (50 Mbq) inside and the radiation is less than 5 μSv on the outside.
Guidelines for working with radioactive substances while pregnant or breast feeding
The working schedule for pregnant women should be such that an unborn child is not subjected to more than 1 mSv. The State Department for Radiation Safety recommends the following maximum limits:
32P 5 MBq ~ 135 μCi
3H, 14C, 33P and 35S 50 MBq ~ 1.35 mCi
dositometry films must be changed once a month.
If a pregnant woman works in a laboratory where colleagues are using open radioactive sources, then the dosage and risk should be seen as the total exposure. The Department of Occupational Medicine (Arbejdsmedicinsk Klinik) can be consulted regarding an evaluation of the risk involved.
When a woman is breast feeding at the time she is working with radioactive substances, she should be aware that in the event of accidental spill, radiation may be transferred to the child through the breast milk. If the amount used is less than the limits for an S1-classification, then the risk is very small.
Accidents with radioactive material
Spill or loss of radioactive material
It is the responsibility of the person who spills to make sure that the spill is cleaned up immediately and thoroughly. If the spill is considerable and over a large area, then an Occupational Health and Safety representative/supervisor and the isotope-responsible staff member must be contacted. A small spill of liquid radioactivity should be wiped up with absorbent paper (paper towel). Spills of powder or other dry material should be wiped with wet absorbent paper. Afterwards, wash with a carrier-solution, i.e., a non-radioactive solution of the labelled substance that was spilled. For 32P-spills, a potassium phosphate solution should be used.
All paper as well as other materials used for cleaning-up should be treated as solid radioactive waste.
After cleaning-up, check the area for radioactive contamination. 32P and 33P can be checked directly with a monitor, but because of the monitor’s low sensitivity for 33P, - beta radiation, an extra precaution for these is to wipe the area with a damp filter paper, dry the paper, put in a scintillation vial with 5 ml scintillation fluid and count in a scintillation counter.
Radioactive contamination of persons
Persons, who frequently work with or nearby 32P, must wear a dosimetry film. The Danish National Institute of Radiation Protection sends the dosimetry results every month and a yearly statement. The limit is 20 mSv/year, although during pregnancy, the limit is 1 mSv, (see Guidelines for working with radioactive substances while pregnant or breast feeding).
Gloves must always be worn when working with radioactive isotopes, and hands must be washed thoroughly afterwards. However, in the event of contamination of the skin, the area should be washed a number of times with a carrier-solution and then several times with soap and water. If there is still sign of contamination (monitor), you should go immediately to the hospital’s casualty ward.
If the skin is damaged, as well as radioactively contaminated (corrosion or sores), rinse liberally with water, possibly opening the sore to induce bleeding and cleansing. Immediately afterwards go to the hospital’s casualty ward.
Clothing which has become severely contaminated should be treated as radioactive waste.
Ingestion of radioactive substances
If you accidentally swallow a radioactive solution, vomiting should be induced immediately (finger down the throat) and go immediately afterwards to the hospital’s casualty ward.
Useful phone numbers
The National Institute of Radiation Hygiene: 24-hour security 0 - 4494 3773, must be contacted for major accidents with radioactive isotopes.
No urgent inquiries and questions: Security Partner 0 - 70 113 113
Reference: "Vejledning om strålebeskyttelse ved arbejde med åbne radioaktive kilder", Statens Institut for Strålehygiejne, 2005 (Guidelines for protection from radiation while working with open radioactive sources), and "Bekendtgørelse om anvendelse af åbne radioaktive kilder på sygehuse, laboratorier m.v.", Bekendtgørelse nr. 954 af 23. oktober 2000 fra Sundhedsstyrelsen. (Act on the use of open radioactive sources in hospitals, laboratories, etc.).
Rules for Class 1 laboratories
Rules for Class 1 laboratories
Rules for genetic engineering work in class 1 laboratories
Rules for genetic engineering work in class 1 laboratories
The following rules only apply to work in Class 1 laboratories. By biologically active material is meant living organisms, cells or viruses which contain DNA or RNA derived from genetic engineering. Isolated DNA, RNA or protein produced by genetic engineering is thus not covered by this definition.
When working with biologically active material, this must take place in areas that are classified by the Danish Working Environment Authority (class 1).
• Bags, coats and other extraneous material must not be present in classified premises.
• It is forbidden to use a private mobile phone in class 1 laboratories.
• Access by unauthorized persons to classified laboratories must be restricted.
• Laboratory gowns must be worn in classified laboratories. These should be yellow, green or white with the special yellow gene technology label on the chest pocket. This also applies to visitors and craftsmen.
• Regular laboratory hygiene must be comply: Food and drink must never be present in the laboratory. Smoking is strictly prohibited. Always remember to wash your hands before leaving the laboratory.
• Mouth pipetting is not allowed.
• All bottles, petri dishes, tubes etc. containing biologically active material must be marked with a yellow marker when leaving the laboratory.
• Transport of biologically active material outside the designated laboratories or areas must take place in containers marked with genetic engineering warning signs (yellow labels or yellow marker). Closed Eppendorf tubes can thus be transported in marked racks, agar plates in marked bags or plastic trays. Glass bottles can be transported in marked plastic trays on a trolley, but be aware that any likely spillage must be collected in the tray.
• All waste containing biologically active material, ie. living organisms cells or viruses containing DNA or RNA derived from genetic engineering must be collected in labelled containers and disinfected. Solid waste is collected in labelled autoclave buckets which are disinfected by autoclaving and then disposed of as ordinary waste. Liquid waste is disinfected with 1% Virkon, which must stand 10-30 min before it can be poured into the drain.
The liquid waste can also be disinfected by autoclaving after which it can be poured into the sink.
• Replacement of filters in the LAF benches and filters in ventilation systems is done by a technician. The technicians must wear respiratory protection and wear work clothes and gloves. The used filters are placed in an autoclave bag and thereafter closed. Autoclaving is then performed by the normal laboratory staff. After autoclaving, filters are disposed of as normally flammable material.
• Glassware and the like, contaminated with biologically active material, must be autoclaved or disinfected with 1% Virkon for about 15 minutes before being sent to normal washing up.
• Waste for autoclaving is collected and transported for autoclaving in closed, labelled steel buckets.
• Needles, scalpel blades and other sharp objects are placed in the special cannula boxes, autoclaved and disposed of as H-solid waste.
• When working with biologically active material, procedures must be limited as much as possible. Possibly. Aerosol-inducing procedures take place in fume cupboards or in LAF benches (vertical airflow cabinets).
• The workplace must be kept tidy and cleaned and disinfected daily. Waste of biologically active material must be immediately dried and washed with 70% ethanol. In the event of a major accident, the safety representative is contacted / notified.
• Disposable gloves that have been used for work with biologically active material in classified premises are autoclaved.
• Hands must be washed after contamination with biologically active material as well as during breaks at work and at the end of working hours.
• Paper should not be left free or suspended freely in the laboratory. Recipes etc. must be covered with plastic. Cardboard boxes must not be stored in classified premises - use plastic boxes instead.
• Note-taking can take place at the workplace either on areas that are delimited with tape or on pull-out plates where these are found. Optionally, the window frames can be used.
• Remember that paper / recipes / books must be kept separate from laboratory settings.
• In the event of accidents, measures are taken in consultation with the person responsible for the project or other competent personal. The safety organization must be informed as soon as possible.
• A logbook must be kept of all accident situations that have given rise to a risk to the safety of persons or to the external environment. The logbook is available at the end of the classified laboratory.
• Signs: There must be signs marked "Genetic engineering laboratory class 1" on doors to the classified areas.
• The responsible head of the laboratory is obliged to instruct the employees and students to carry out the projects properly and in accordance with the existing safety regulations for work in the classified laboratories. It must always be possible to summon a professionally competent person. The telephone lists are hung at the entrance to the classified laboratories.
Procedure for upgrading from Class 0 to Class 1
Procedure for upgrading from Class 0 to Class 1
· The Danish Working Environment Authority (”Arbejdstilsynet”) must be notified when a laboratory is upgraded. This contact is made via the department’s OHS organisation. Upgrading of a laboratory can only take place after permission has been given.
· A person is selected to have the overall responsibility in cooperation with the HSO representative and they apply to the Danish Working Environment Authority for a Class I approval. The person’s name is given to the Danish Working Environment and written in the logbook for the laboratory.
· At the entrance to each classified room is a notice with the telephone number of the person responsible for that room.
· For cleaning purposes, classified laboratories/areas should contain only the most items. All items standing on the floor must be removable (on wheels).
· All persons working in a classified laboratory /area must wear buttoned-up lab coats.
· Use of the logbook is a requirement from the Act relating to gene technology. The date of the upgrading is to be entered into the logbook.
· A warning sign stating: “Genteknologisk laboratorieområde - Klasse 1” (Class I laboratory for Gene Technology) must be found at the entrance to the laboratory.
· Round plastic containers for solid hazardous waste, labelled autoclave buckets, and containers for sharp objects must be found in classified laboratories
· Bottles with 70% ethanol must be found in classified laboratories.
· Lab coats must be hung on hooks just inside the classified laboratories.
· Cleaning personnel must wear lab coats when working in Class I laboratories. The person responsible for a laboratory must inform the OHS Committee (Secretariat) whenever an upgrading occurs. Laboratory personnel must carry out the daily cleaning and disinfection of the working area and the items used.
· Students working with biologically active material must be supervised by competent persons.
· Stainless steel buckets for autoclaving must be placed in upgraded laboratories. These buckets are to be used for the collection and decontamination of items used while working with biologically active material (disposable pipettes, centrifuge tubes, etc.).
Cleaning instructions for classified laboratories
Cleaning instructions for classified laboratories
The cleaning staff must wear a buttoned up yellow or special white lab coats with a yellow gene technology mark on the chest pocket when cleaning classified laboratories bearing a notice “Gene technology laboratory Class I”.
At INANO, a yellow lab coat labelled “Rengøring” (”Cleaning”) is to be found on each floor in all the buildings. The lab coat hangs on a hook labelled “Rengøring” and is to be used only in classified laboratories.
When the lab coat needs washing, place it in the laundry basket in the laundry room unless it is contaminated with active biological material. In this case, the kit must be placed in a gelatine bag which is dissolved during the washing process
The cleaning staff’s daily cleaning routine consists of mopping the floor and removing ordinary trash. Note that the trash is removed together with the waste bag, and that waste must not be poured from one bag to another. The waste bags must be closed before they are removed from the laboratory.
In addition to the daily cleaning, the floor must be washed 2-3 times a week. Trolleys and hazardous waste boxes must be moved out when the floor is being washed.
At iNANO, floor cloth, soapy water and bucket are only to be used in the classified laboratories and the water is to be poured in the sink. The bucket and floor cloth may thus not be used anywhere else. When the floor cloth is to be washed, it must be autoclaved first. This is done by putting the cloth in an autoclave bag, closing it with autoclave tape and labelling it with yellow tape. After autoclaving, the cloth is washed in the usual way.
In addition, the cleaning staff is responsible for taking care of the following tasks:
· Dusting and vacuuming elevated ventilation channels and electrical fixtures every six months
· Cleaning the cooling systems in the laboratories every six months
· Cleaning under refrigerators and freezers twice a year (laboratory personnel must pull them out and put them back)
· Cleaning all stationary furniture /equipment below table/bench height.
The dates for the thorough cleaning must be entered into the logbook.
The laboratory personnel are responsible for the daily cleaning of laboratory sinks, window sills, tables/benches, fume cupboards, sterile benches and other work places, as well as a monthly cleaning of shelves, cupboards, bottles, electric supplies, free-standing apparatus and furniture.
In connection with the up- or downgrading of a laboratory, all the above cleaning procedures must be carried out.
In the event of an accident, a notice must be placed on the door to the laboratory and the person responsible for the laboratory must be informed. The name of the person responsible for the project is to be found at the entrance to the laboratory. The cleaning must be discontinued.
Instructions for cleaning staff, workmen and other unauthorized personnel
Instructions for cleaning staff, workmen and other unauthorized personnel
When you enter a laboratory, you should behave as though everything is hazardous. Therefore:
· do not move anything
· do not touch anything
· do not attempt to smell the contents of bottles
If you accidentally knock something over, leave it as it is but inform one of the laboratory personnel.
The incident may appear to be harmless, but it can be dangerous, or the results of several days’ work. A knowledgeable person may be able to salvage the pieces, whereas everything will be lost if you attempt to put things right.
If you break a glass bottle and the contents run out, you must leave the laboratory at once. Do not attempt to wipe it up because the substance may be corrosive or poisonous. If you spill some on yourself, leave the room, and quickly wash with lots of water. Inform someone who can evaluate the situation.
If you come across something which makes you feel uncertain, e.g. a strange smell, sound, or smoke, go out of the room immediately and inform someone who can decide whether it is hazardous or not. Remember that the Occupational Health and Safety representative/supervisors are here to be helpful.
It is better to ask too often than too seldom!!
Do not work alone. If you must work in a room where nobody can see you, inform someone about what you are doing and tell them when you are finished.
In case of an accident, remember
· do not touch anything, but leave the room
· wash with lots of water if you spill something on yourself
· fetch laboratory personnel
When you enter a laboratory, which has a sign “Genteknologisk laboratorieområde - Klasse 1” you must wear a buttoned up yellow lab coat or a white one with the special yellow gene technology symbol on the chest pocket. Cleaning utensils that you use in these laboratories must not be used in other areas.
Persons you can contact:
Safety committee at iNANO
Handling of chemicals
Handling of chemicals
Receiving chemicals
· Certain chemicals, except solvents, are received in postroom 2nd floor, 1590
· Solvents and chemicals are received in room 1593-218 (student helpers office) or room 1591-016 (chemical storage)
· Transport in the house must be done safely. Usually chemicals are shipped securely packaged and transported to the laboratory in the mail package; large and heavy gaskets with e.g. solvents, acids and bases are transported in a trolley.
· Many corrosive and hazardous chemicals can often be purchased in plastic bottles with plastic safety coating. If a bottle is dropped, the contents will not run out.
· All received chemicals must be labelled with a bar code and registered in KIROS. When requiring special precautions for a chemical, it must be indicated on the chemical labelling.
· KIROS works as a workplace manual for the individual chemicals and in KIROS there is also Material Safety Data Sheet. (MSDS)
· In the labelling and handling of chemicals we are considered as end users; we are therefore not obliged to change obsolete safety instructions and R and S phrases to H and P sentences
· Gases are delivered in an approved gas cage, where the pressure cylinders are securely fastened with a chain.
Storage of chemicals
I. A common stock primarily for solvents in approved rooms
II. Local stocks in the research groups (possibly shared between several groups).
III. In the research and teaching laboratories.
· Solvents: The solvents are ordered in units that have a size so to avoid any kind of storage in the storage type I and II. Ie. that the units received can be used in the laboratories. The size of the units is determined by the solvents' classification.
· Explosion-proof cabinets should be used for larger storage of solvent in latex type I and II. Explosion-proof cabinets must not be located in laboratories.
· Other common chemicals: Store in stock I-III in enclosed ventilated enclosures.
· Acids, bases and highly oxidizing chemicals must always be stored separately from solvents
· Poisonous and licensed chemicals: Store in specially locked cabinets and keep accounts with the quantities.
· Pressurized gas cylinders are securely transported in special bottle carts and must always be securely stored in laboratories and in no larger quantities than necessary. Reduction valves must be approved for the gas in question. Outside the laboratory, an approved sign with the text must be fitted: “Trykflasker – Fjernes ved Brand” ("Pressure bottles - Remove when fire").
Use of chemicals Research Laboratories:
· Anyone working in a chemistry laboratory must have completed the Chemical Institute's safety course and fire extinguishing course before they get independent access to the laboratories and receive key cards and keys.
· Anyone who works in a chemistry laboratory must sign that he/she has read, understood and will comply with the safety rules for working with chemicals and equipment.
· Anyone working in a molecular biology laboratory must have undergone safety regulations, waste management and general chemical handling before they gain independent access to the laboratories and receive key cards and keys.
Waste management
Waste management
H - WASTE LIQUID
The constituents of the waste: Buthanol, > 25% ethanol, > 25% acetic acid (with larger quantities also collected below 25%, applies to both ethanol and acetic acid), approx. 1% Coomassie blue, methanol, acetonitrile, propanol, tetrahydrofuran, acetone, dioxane, guanidine hydrochloride. Small amounts (about 1%) of paraformaldehyde, silver nitrate, phosphoric acid, trichloroacetic acid and other halogens below 1%.
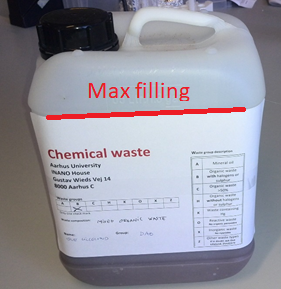
Liquid waste containers
Liquid waste must only be poured into approved 5 L containers, which are collected in room 1590-049.
Containers must only be filled to the top mark (See photo). The lid is screwed securely and tight with the special tool (found in room 1590-049). The waste containers are put into the correct transport bins in the waste room 1590-051. Filling and suggestions for marking as shown in photo.
H - WASTES SOLID
Waste constituents: Gels, napkins, pipette tips, gloves and the like with very small amounts of chemicals. Cannula boxes for needles and scalpels.
Dry GMO waste must be autoclaved and disposed of as ordinary waste.
H - WASTES FROM SCINTILLATION SELLERS AND ELISA CHARGERS
Waste constituents: Counting fluid OptiPhase Hisafe 3[JNP1] (including di-isopropyl naphthalene and polyethylene glycol mono-4-nonylphenyl ether)
Elisa plates with very small amounts of organic / inorganic chemicals (eg Bradford, Lowry).
B - WASTE LIQUID
Waste components: Chloroform, phenol, <10% isoamyl alcohol in tubes, trichloroacetic acid, sulfolane, acetone. Halogen over 1%. Notify your security representative if anything else is left in the list!
B - WASTE SOLID, CARBON FILTER
Waste constituents: Carbon filters and carbon bags with ethidium bromide residues REMEMBER: The carbon filters / carbon bags are wet and packed wet in plastic bag.
C - WASTE
Waste constituents: Equal to or more than 50% solvent. Collected in smaller containers in the laboratory, disposed of in barrel in waste container. Do not contain halogens.
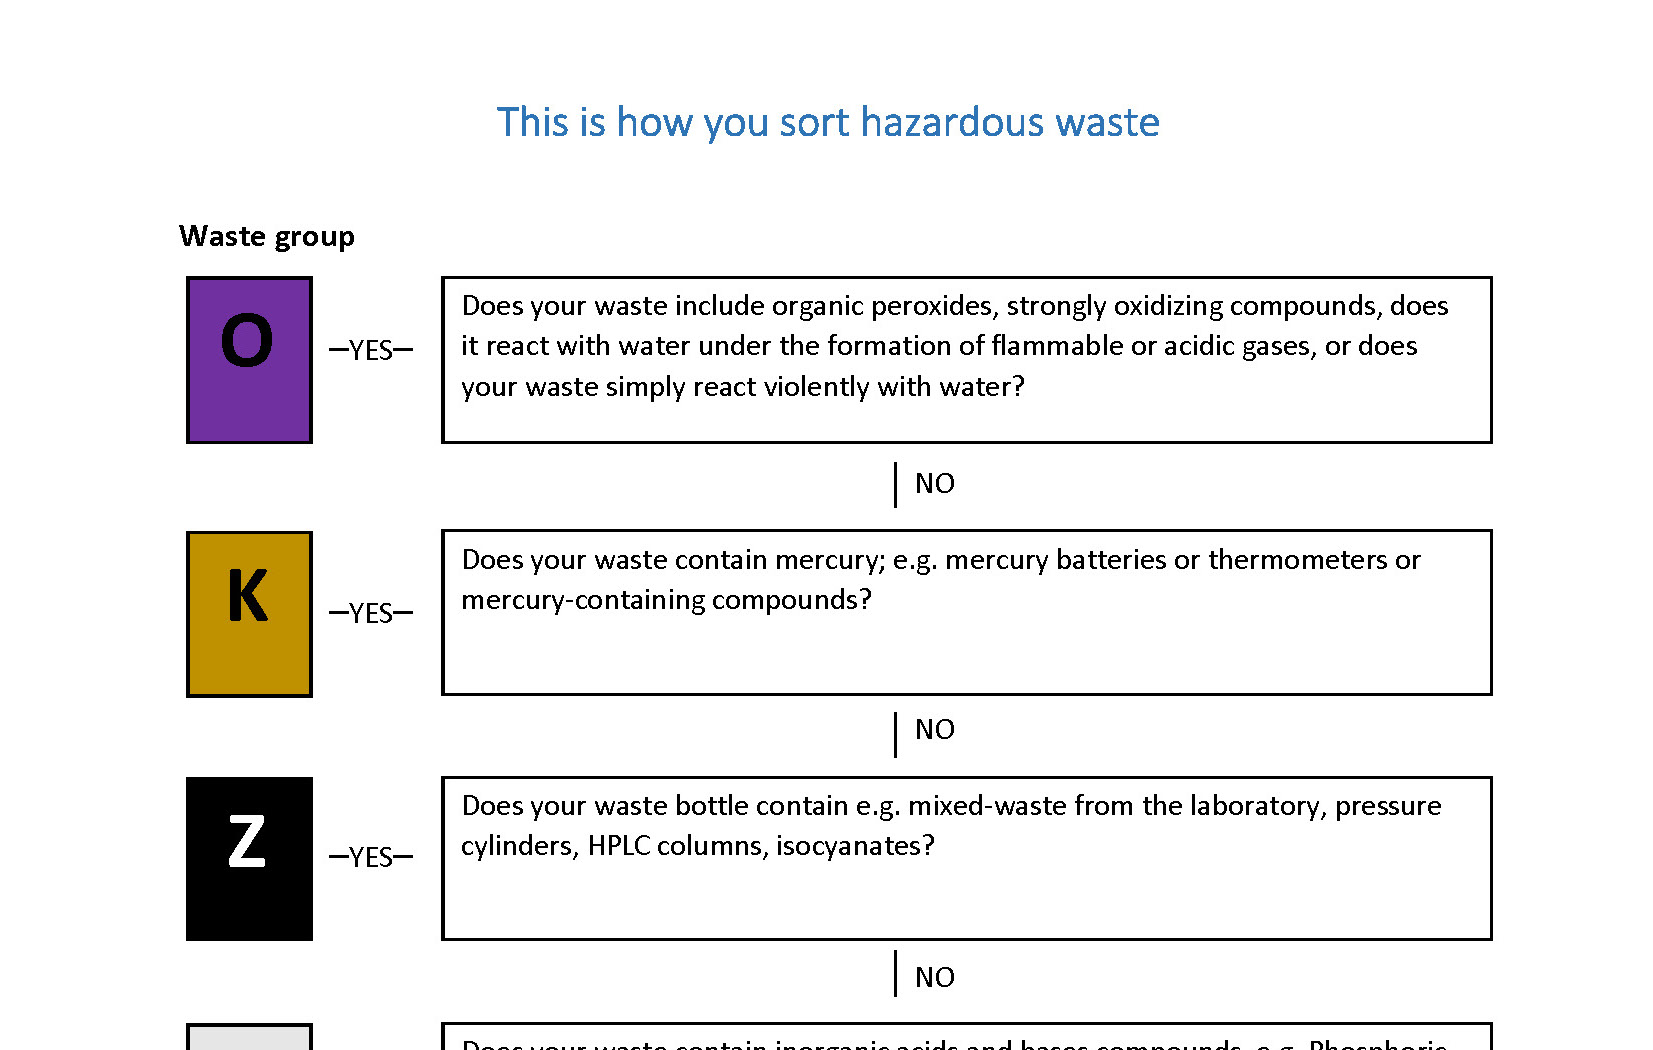
Z - waste (chemicals)
Waste constituents: Mixed laboratory waste from clean-up.
A barrel: for solid Z-waste - write consecutive numbers, the chemical name, the quantity (in%), your initials and group names in the logbook.
A barrel: for liquid, corrosive and acidic - as stated above, write in the logbook on the barrel.
A barrel: for liquid, corrosive and basic - as stated above, write in the logbook on the barrel.
Remember: O waste must always be packed in a barrel by itself.
You may pack 2 mercury thermometers or mercury lamps at the top of the barrel in a thick plastic bag, if you write it under “affaldets bestanddele” ("The components of the waste")
Z - WASTE - SPRAY CANS
Waste components: Empty spray cans as well as empty small butane gas cans
O - WASTE - REACTIVE WASTE
Waste components: See the list of "O substances" (reactive substances)
It must be written in the book which substances come in the barrel, as the different types of reactive waste must be kept separate from each other.
An O-waste barrel, especially for hydrogen peroxide 20 - 60%
X - WASTE, LIQUID AND HEAVY METALS
Waste constituents: Elisaplader with small amounts of heavy metals. Liquid nickel chloride and copper sulfate from columns. Notify your safety representative if any metals other than nickel and copper are being poured.
A - WASTE, SPILL OIL
Waste components: Engine oil (not chlorinated oil, Fp over 61 ° C), oil from vacuum pumps.
FOR BATTERIES IN GENERAL
There is a box in the student helpers office for used batteries
GMO waste
All solid waste must be autoclaved and disposed of as ordinary waste. Liquid waste can be autoclaved or treated with Virkon S (10/00) and then poured into the sink.
Radioactive waste
After storage for 10 half-lives, radioactivity has decreased to approx. 1/1000. This will often be an appropriate time for contaminated glassware and other highly radioactive waste.
32P waste must be stored for 5 months
35S and 33P waste must be stored for 30 months
125I waste must be stored for 20 months
After storage it can be considered as ordinary, non-radioactive waste. Waste after iodination (solid form e.g. in gel matrix or aspirated into absorption material or absorbent of the like) is stored in closed 1" steel tubes which are stored for at least 20 months.
Working safely with electricity
Working safely with electricity
These shortened guidelines are based on information from the website of Department of Molecular Biology and Genetics:
http://mbg.medarbejdere.au.dk/en/working-environment/safety-with-electricity/
where there are illustrations of the correct plugs and sockets as well as wrong and dangerous plugs.
Safety when working with electricity must be taken very seriously.
Strict regulations were imposed in 1993 regarding:
· Equipment safety
· User familiarity with safety conditions
Discard any apparatus that fails to meet safety standards.
When in doubt, do not use it and ask a technician to take care of it.
General information on the dangers posed by electrical equipment
· Electric shocks cause muscles to contract violently, resembling a cramp or seizure.
· The most serious electrical accidents lead to cardiac arrest, while a milder shock can cause significant discomfort.
· Never touch electrophoresis apparatus or the electric cables when the electricity is switched on. (Under proper conditions* this should not be possible).
· Most liquids in the laboratories conduct electricity. Many of them are even very good conductors and correspond to a direct connection with the connected core.
· Electrical apparatus and cables must always be clean and dry, without salt deposits. Never handle electrical equipment with wet hands or gloves (the thin rubber gloves do not protect against high voltage).
· The cold room increases the risk of electrical failure and accident because of condensing water.
· The two most dangerous currents are 230 volt mains electricity and that from high voltage electrophoresis apparatus.
If in doubt whether the apparatus is safely set up, think about this basis rule:
* The apparatus must be protected against accidental touching of live current in any situation!

230 volts mains electricity
All electrical equipment must be earthed via the mains cable. This provides better protection from electric shock and accidents even when there may be some leakage in the apparatus.
Therefore: All laboratory apparatus must have a Danish 3-pin mains plug that is earthed, 2 round pins and one flat “earth “pin below!
· Mains cables with 2-pin plugs are not earthed and must NOT be used (see picture). Throw them away. The correct plugs can be obtained through the electronic workshop (Incuba)
· Plugs and cables must be in perfect condition. Users must make sure that the mains connections, i.e., mains socket and apparatus socket are not damaged (the plug pins are intact and the cable insulation is not torn, etc.).
Note also that:
· cables must be of robust quality, without holes or burn marks from hot plates, etc.
· cables must be attached firmly to the mains and to the apparatus.
When in doubt about the quality of the mains cable, discard it and get a new one.
Please note: Leakage circuit breakers cannot handle everything. They can only ensure against leakage from 230 volt mains connection to earth, and may thus prevent an electric shock. Contact with both “active” mains cables will give many kilowatts for hours. Leakage circuit breakers do not protect against errors in the high voltage output.
High voltage connection to electrophoresis apparatus
· Cables must be of high quality and always have approved “safety plugs”
· Cables and gel apparatus must have insulation against more than 1000 Volt (even 1500 Volt.)
In other words:
· Silicon rubber cables that give a continuous heat should be used
· Avoid rubber tubing (they crack) and thin plastic tubing that melts in contact with the edge of a hot plate.
· Never use transformers, adjoining cables or adaptors that can transform the approved safety sockets to those that are less safe. They are dangerous and must be discarded.
· Cables and gel apparatus must be capable of taking the same current as the attached safety plug.
Safety plugs and sockets of the correct type
Only two types of safety plugs are allowed. Other types are not allowed in the laboratories.
Note that both types have solid insulation sleeves so that the plug pins cannot be touched directly.
· Ordinary 4 mm safety plugs that are standard for most equipment. They are internationally approved and are suitable for about 1000 volt when they are dry.
· 2 mm safety plugs with a longer, stronger covering, suitable for up to 1500 volt.
Please note that plugs with resilient coverings are unsuitable as they are only for low voltage (to minimise short circuit). Under no circumstance must they be used or be available! The same applies for old-fashioned banana plugs (as well as sockets and extension cables). They must be discarded as they do not meet the regulations and are far too dangerous.
Safe power supplies
· Power supplies must of course have the correct sockets, corresponding to the correct safety plug.
· 4 mm safety sockets have mouldings suitable for the plugs covering.
· 2 mm safety sockets are deeper, corresponding to the long plug’s bigger covering.
· Equipment with old-fashioned sockets for banana plugs must be discarded.
· Power supplies with high voltage current must be insulated with respect to “earth” or have a safety circuit that breaks when earthed (this can be checked by technicians).
New equipment
All new equipment must be CE-marked (this has been obligatory since 1997). However, a CE mark is not an approval (as many think), but merely the factory’s statement that the equipment is safe to use. You must therefore be critical and evaluate the equipment before buying!
Note, that Bio-Rad, for example, uses a “longer, modified, banana plug” without a solid covering, with accompanying lowered sockets in their power supplies.
Maybe this looks reliable when their equipment is assembled, but it is especially dangerous when used together with other equipment having the correct safety sockets.
It is stressed that:
· banana plugs with exposed electrical parts must be discarded immediately
· plugs with resilient coverings must not be used
· high voltage plugs and sockets must be the standard safely type with solid coverings
· all electric laboratory apparatus must be earthed, i.e., mains plugs must be Danish with 3pins
· you should contact the electronic technicians before buying new equipment to make sure that it is in agreement with the above rules.
Instructions for the use of large apparatus and centrifuges
Instructions for the use of large apparatus and centrifuges
Names of contact persons are to be found by each apparatus. Ask them for advice about the use of apparatus.
Students, trainee technicians, and all other users who do not have a thorough knowledge about the use of the apparatus, must - before attempting to use it - have clear instructions. It is the responsibility of each supervisor or project leader to ensure that each student or new person is well-instructed in the use of the apparatus. Instructions regarding use can be found in the "Instruction Manual" beside the machine. If in doubt, ask one of the contact persons.
In the event of breakdown
Please notify the responsible contact person for the apparatus.
Cleaning
It is not a matter of doing a spring clean, but the obvious and necessary cleaning that must follow every time it has been used. Each and every user must make sure that the apparatus is cleaned!
In the event of spillage of genetically modified material, the spill must be wiped up and the area disinfected with 70% alcohol.
Rotors must NOT be washed with ordinary soap with a basic pH. A bottle of this should be found by each centrifuge.
Remember that centrifuges must be closed in such a way that the lid cannot be lifted while a rotor is in action. Rotors must never be stopped by hand.